TechSuite Windows App
TechSuite is a portable Windows app that automates computer repair. It runs diagnostic, malware, cleanup, maintenance, network and software tools, one at a time or as a Procedure, and writes a branded report that’s uploaded to your Online Dashboard.
This page covers TechSuite 2.0.
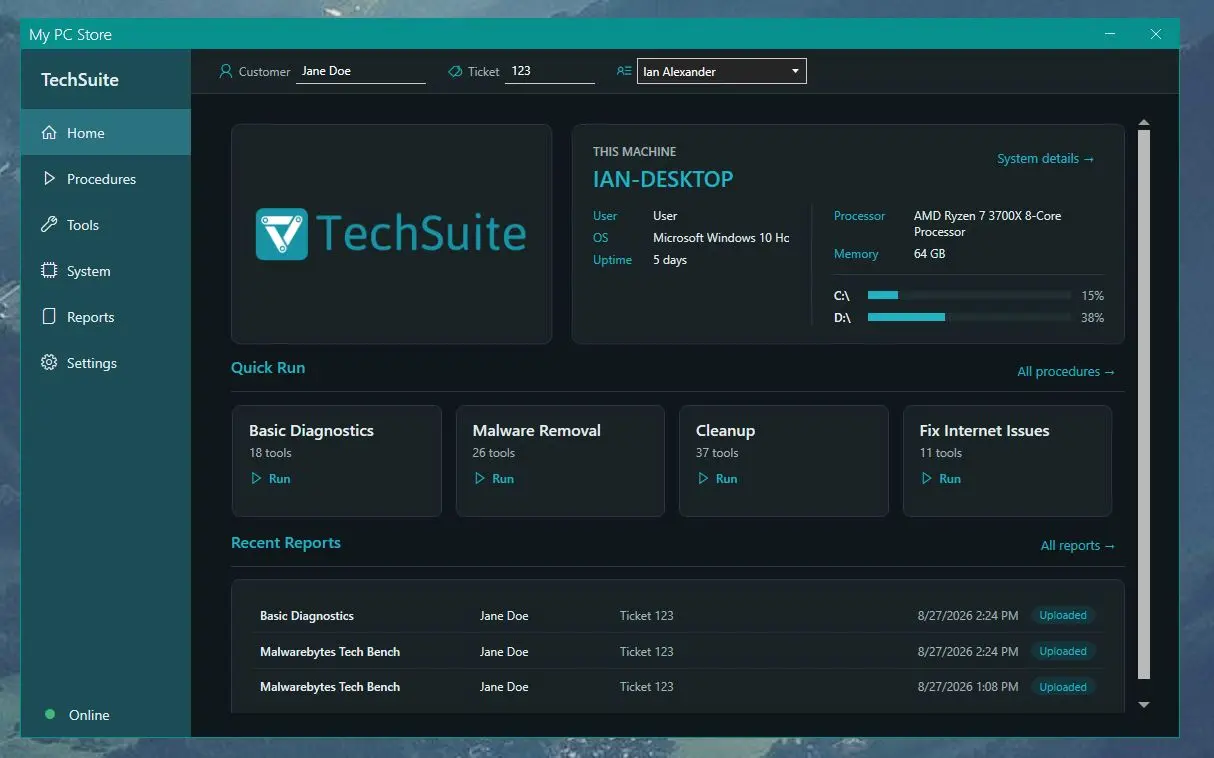
Getting started
- Log in to the Online Dashboard and open Downloads.
- Click Download next to TechSuite Windows App. The file is
TechSuite.exe. - Put it anywhere: the desktop, a network share, or a USB stick. There’s nothing to install.
- Run it. Windows asks for administrator permission, which TechSuite needs to repair the machine. The first time it starts, it syncs your shop’s tools, procedures, branding and technicians.
Each download is tied to the technician who downloaded it, and reports upload under that technician’s name.
Requirements: Windows 10 or 11 (TechSuite also runs on Windows 7 SP1 and 8.1, but some tools need Windows 10 or later) and .NET Framework 4.8. TechSuite needs an internet connection to sync and upload reports. You can also prepare it for offline use.
Files: TechSuite creates a TechSuite folder next to TechSuite.exe, containing Config, Tools and Reports. You can delete it when you’re done with a machine. Only one copy of TechSuite can run at a time.
A few terms
- Tool: a single program TechSuite runs, such as Test HDD for Issues or Windows Defender.
- Mode: how a tool runs. For example, Windows Defender has Diagnostic Scan, Quick Scan, Full Scan and Update Signatures modes.
- Procedure: an ordered list of tools, each with a mode, that runs with one click.
- Report: what TechSuite produces after a run: the machine’s details plus each tool’s results.
- Customer, Ticket and Technician: entered before a run to label the report. The ticket number is also how PSA integrations attach the report to the right ticket.
Finding your way around
The menu down the left side has Home, Procedures, Tools, System, Reports and Settings. The tile at the bottom shows whether TechSuite is online or offline.
The bar across the top holds the Customer, Ticket and Technician for the current job. Fill it in before you run anything.
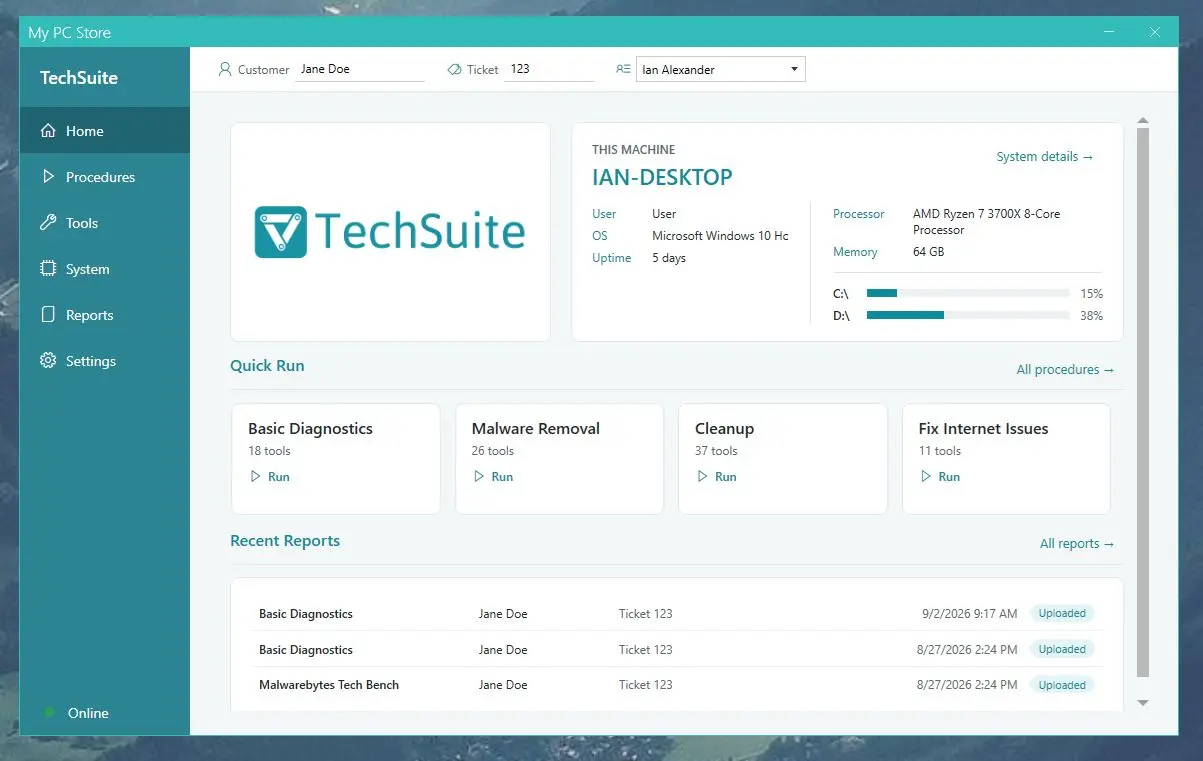
Home shows your shop’s logo, the machine you’re working on (name, current user, Windows version and uptime), its processor, memory and drive space, Quick Run tiles for up to four favorite procedures, and your three most recent reports.
Running a Procedure
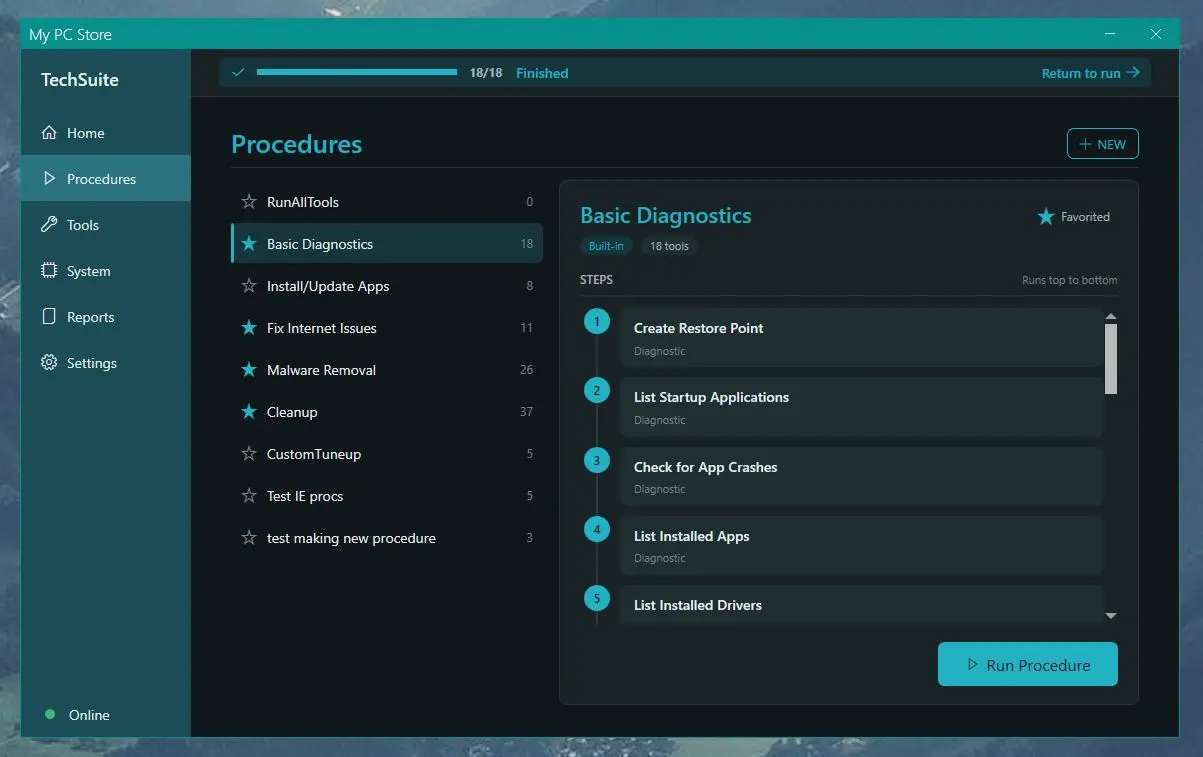
- Open Procedures. Pick a procedure on the left to see every step it will run on the right.
- Check the customer, ticket and technician in the top bar.
- Click Run Procedure.
The run screen shows a live timeline: finished steps, the tool that’s running now, and what’s next. Use Skip to move past a tool and Stop to end the run. Turn off Generate Report if you don’t need a report for this run.
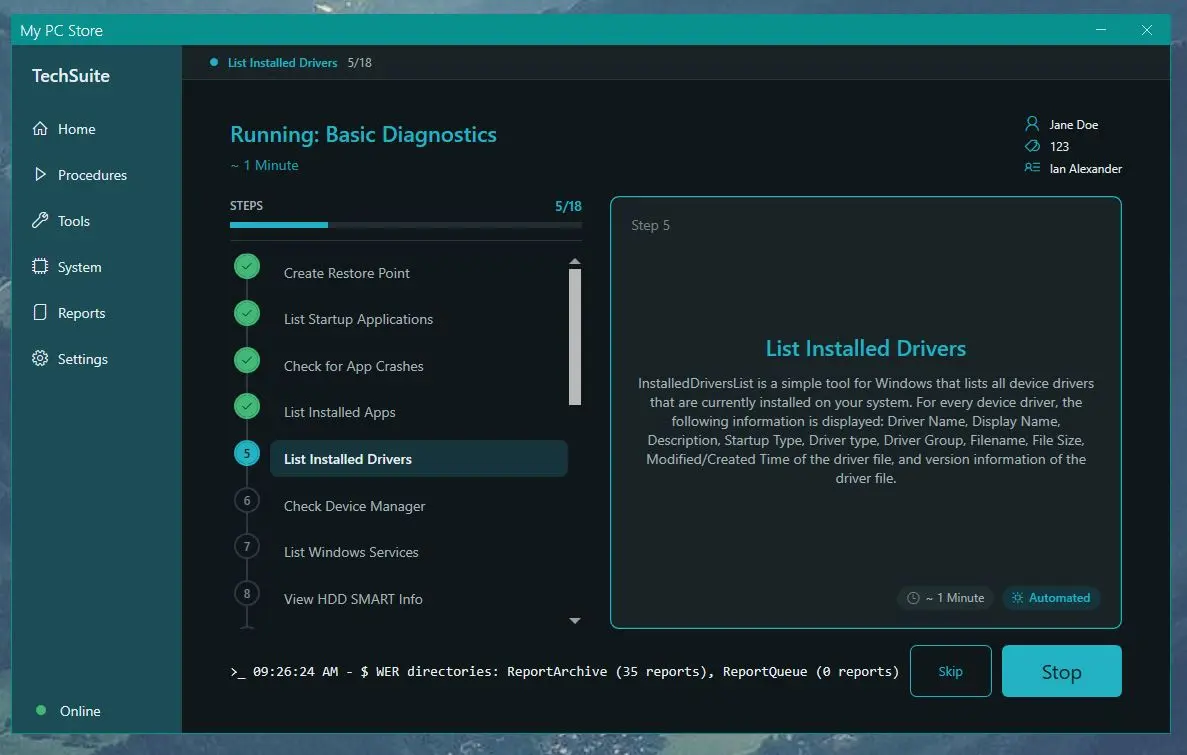
You don’t have to watch it. While a procedure runs you can go anywhere else in TechSuite. A banner across the top shows its progress; click it to go back to the run. When the run finishes, the banner links to the results.

Tools that need you. Some tools need a technician to click something. The run pauses until you do. The Online Dashboard shows these runs as a Manual step on On the Bench, and a webhook can alert you.
If a run is interrupted, for example by a restart, TechSuite starts again when Windows does. It offers to resume the procedure and continues automatically after 10 seconds.
Favorites. Click the star next to a procedure to add it to the Quick Run tiles on Home.
Running a single tool
Open Tools, pick a tool, choose its Run mode, and click Run Tool.
Default procedures
TechSuite comes with five procedures. Each one starts by creating a restore point.
- Basic Diagnostics. Checks the machine rather than fixing it. It lists startup apps, installed apps and drivers, and Windows services. It checks for app crashes and blue screens, and checks Device Manager, drive health (SMART and a drive test) and the battery. It recovers product keys, checks printers, and runs Fix Filesystem Issues in Diagnose Only mode. It lists available Windows Updates and runs a HijackThis scan, a Windows Defender diagnostic and Network Diagnostics.
- Cleanup. Clears the Windows Update cache, Chrome and Firefox data, and system clutter: temp files, logs, prefetch, memory dumps, the Recycle Bin and old update files.
- Install/Update Apps. Syncs the clock, installs pending non-driver Windows Updates, installs or updates common apps such as Firefox and Chrome, and updates Windows Defender’s signatures.
- Malware Removal. Stops unneeded processes with ProcessHawk and checks the network. Lists installed apps, startup items and services, and checks for crashes and blue screens. Cleans browsers, temp files and the Windows Update cache. Scans with Reason Core Security and a Windows Defender full scan, and runs HijackThis. Then it repairs what malware commonly breaks: proxy settings, DNS, the TCP/IP stack, Winsock, the firewall configuration, the HOSTS file and the clock.
- Fix Internet Issues. Runs Network Diagnostics first. Then it flushes and repairs DNS, resets proxy settings, restores the HOSTS file, renews the connection, resets the network adapter, the firewall configuration, TCP/IP and Winsock, and syncs the clock.
Fix Filesystem Issues in Diagnose Only mode reports problems without repairing them. To repair, run it in Repair mode, or Repair + Chkdsk to also schedule a disk check at the next restart.
You can’t edit the default procedures, but you can use one as the starting point for your own.
Building your own Procedure
- Open Procedures and click NEW. To start from an existing procedure, choose it as a template.
- Search for tools. The search covers every category, and the details panel describes each tool as you pick it.
- Choose each tool’s mode and click Add to Procedure.
- Put the steps in order, then save.
Use ORDER on the Procedures page to change the order procedures are listed in, Edit to change one, and Delete in the procedure builder to remove it.
You can also create procedures in the Online Dashboard under Procedures, including copies of the default procedures (Clone). TechSuite picks up changes the next time it starts.
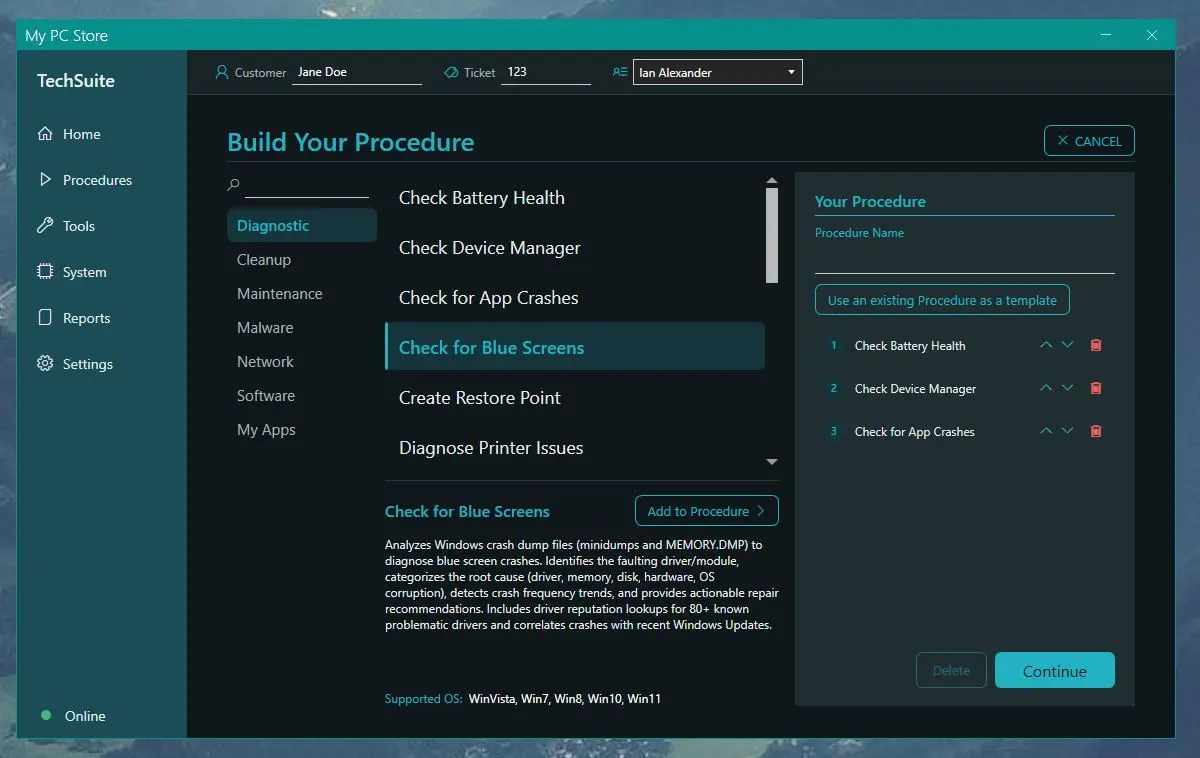
Tools and modes
TechSuite has about 150 tools in six categories: Diagnostic, Cleanup, Maintenance, Malware, Network and Software. The Tools page shows each tool’s logo, the Windows versions it supports, and its modes.
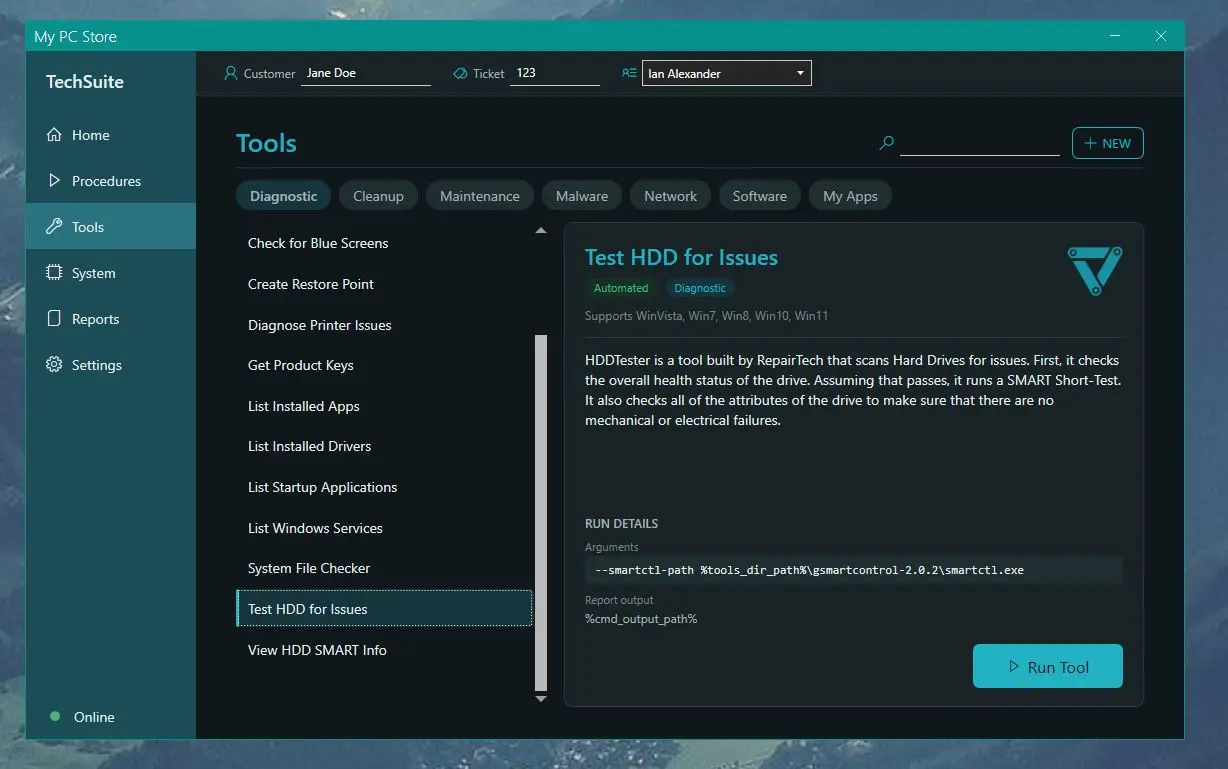
Modes change how a tool behaves. For example:
- Install Windows Updates: List Available Updates, Install Non-Driver Updates, Install Updates (Including Drivers), Install Security Updates Only, or Service Status Check.
- Windows Defender: Diagnostic Scan, Quick Scan, Full Scan, or Update Signatures.
- Fix Filesystem Issues: Diagnose Only, Repair, or Repair + Chkdsk.
The tool catalog has detailed pages for many of the tools. We add and update tools regularly; the release notes cover each change.
Custom Apps
Custom Apps add your own tools and scripts to TechSuite. They run inside procedures like the built-in tools, and their output goes into the report. They’re listed under My Apps on the Tools page.
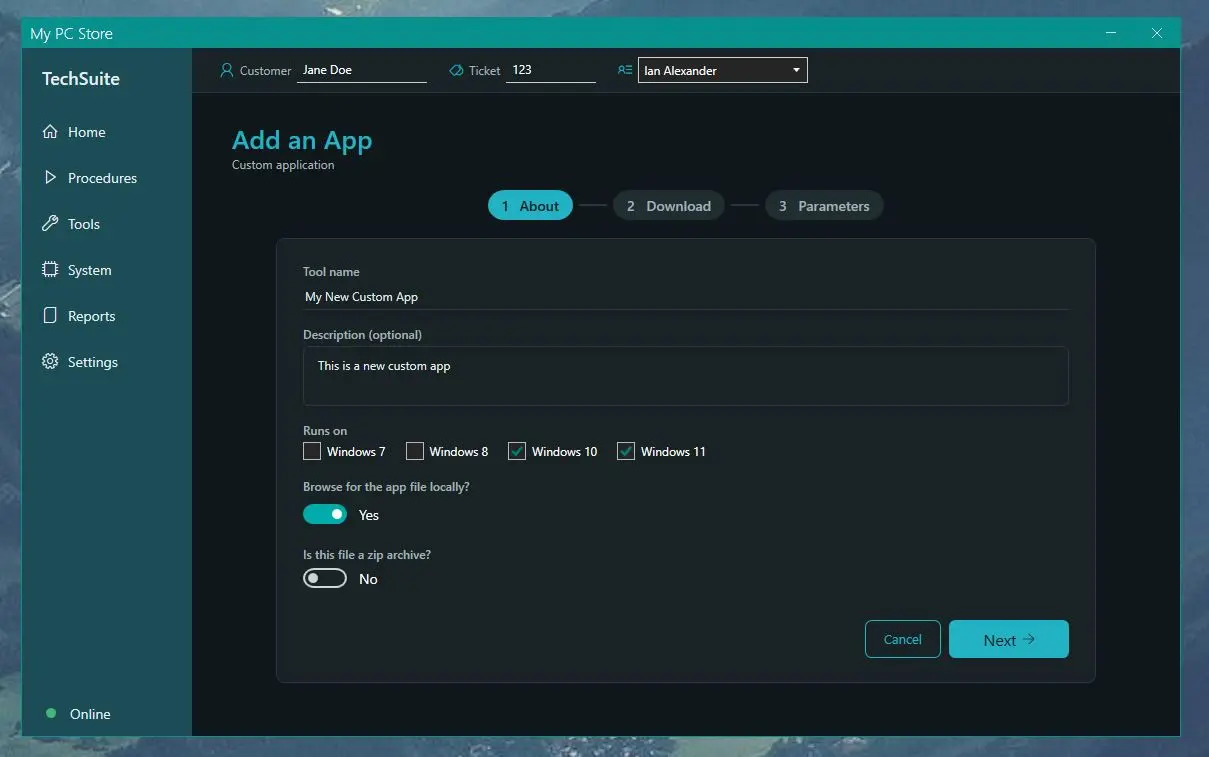
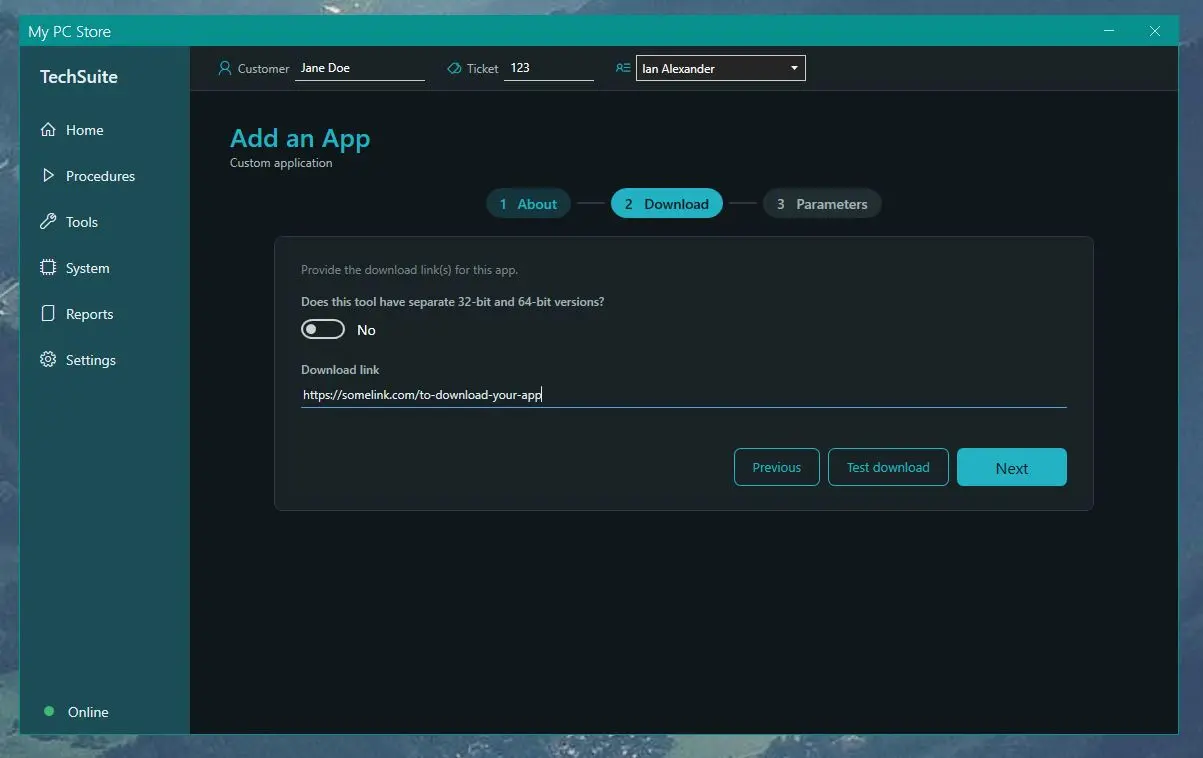
To add one, open Tools and click NEW, or click Edit on one of your apps. The wizard has three steps:
- About: name, description, the Windows versions it runs on (7, 8, 10, 11), whether you’ll pick the file from this computer instead of giving a download link, and whether the file is a zip archive.
- Download: the download link (or separate 32-bit and 64-bit links), or the file from this computer. TechSuite accepts
.exe,.msi,.bat,.ps1and.zipfiles. For a zip, give the path of the file to run inside it. Use Test download to check a link. - Parameters: whether the tool needs a technician to interact with it, its command-line arguments, and where it writes its log file, so the log ends up in the report.
Files from this computer are uploaded to your shop’s hosted storage, so every copy of TechSuite can download them. The app accepts files up to 100 MB. For larger files, create the app in the Online Dashboard under Custom Apps, where you can also give it several modes (a name plus command-line arguments for each). Each shop has 1 GB of hosted storage; the Custom Apps page shows how much is used.
PowerShell scripts run through powershell.exe. If you don’t set a log file, TechSuite puts the script’s output in the report. In the file picker, choose All files to see .ps1 files.
Apps that need a technician pause the procedure until someone interacts with them, so put them at the start or end of a procedure.
Command-line arguments depend on the app. Check the developer’s documentation for the switches it supports, such as a silent-scan or log-file option.
Variables
You can use these in a Custom App’s arguments and log file path. TechSuite replaces them when the app runs:
| Variable | Replaced with |
|---|---|
%tool_path% |
The folder this app was downloaded to |
%tool_file_path% |
The file TechSuite runs |
%tools_dir_path% |
TechSuite’s Tools folder |
%reports_dir_path% |
TechSuite’s Reports folder |
%config_dir_path% |
TechSuite’s Config folder |
%report_path% |
The folder for the current report |
%raw_report_path% |
Where this app’s raw log for the report should go |
%parsed_report_path% |
Where this app’s parsed log for the report should go |
%cmd_output_path% |
The file TechSuite captures this app’s console output to |
%timestamp% |
The current date and time, e.g. 20260918143005123 |
Standard Windows variables such as %TEMP%, %APPDATA%, %ProgramFiles% and %USERPROFILE% work too. For example, a scanner that writes its log to a logs folder next to itself would use %tool_path%\logs\scan.log.
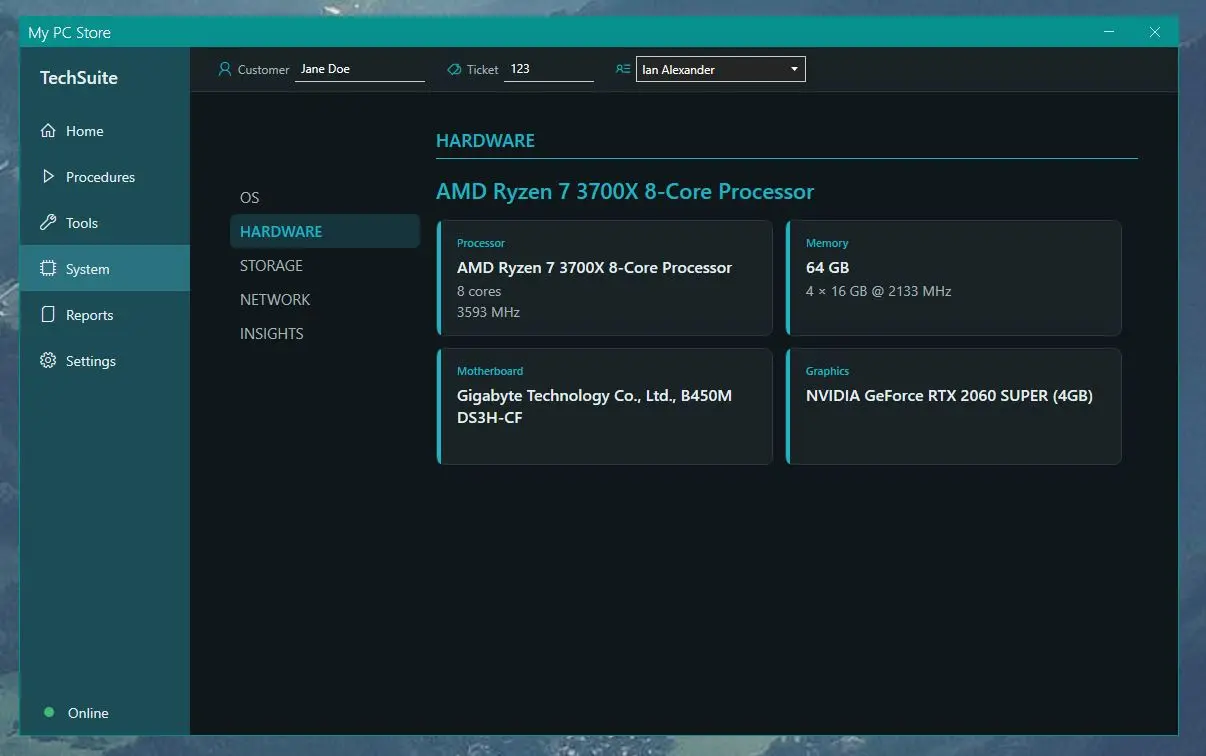
System
The System page shows the machine’s details in sections: OS, Hardware, Storage, Network and Insights. Dots highlight anything that needs attention, such as a nearly full drive. Click Generate Insights to check the machine again.
Insights
Insights are quick flags for common problems, such as a nearly full drive, no antivirus, recent app crashes or blue screens, the firewall being off, or Device Manager errors. They appear on the System page, and reports can include them. Choose whether they show with your report layouts.
Reports
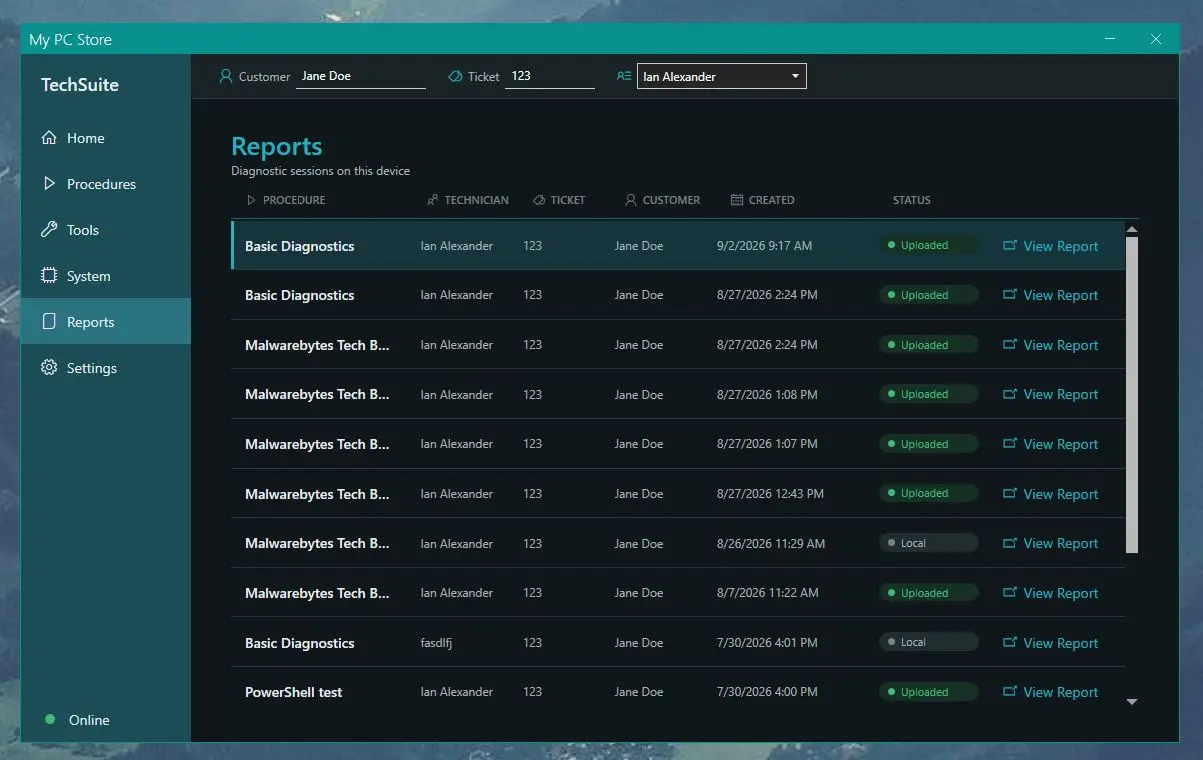
When a run finishes, TechSuite writes a report and uploads it to the Online Dashboard, where you can view, edit, share and send it to your PSA. The Reports page in the app lists this computer’s reports, newest first, and shows whether each one has uploaded or is still only on this computer. Click View Report to open one.
A report includes:
- Report information: technician, customer, ticket, date, how long the run took, and the title (the procedure’s name, by default).
- The machine: Windows version, processor, memory, motherboard, graphics, and each drive’s size and usage.
- A section for each tool with a summary of what it found or did. Tools can produce thousands of lines of output; TechSuite picks out what matters and highlights it. The full output is one click away.
In the Online Dashboard, reports can also carry an AI summary, and you choose what each report shows with report layouts.
Offline mode
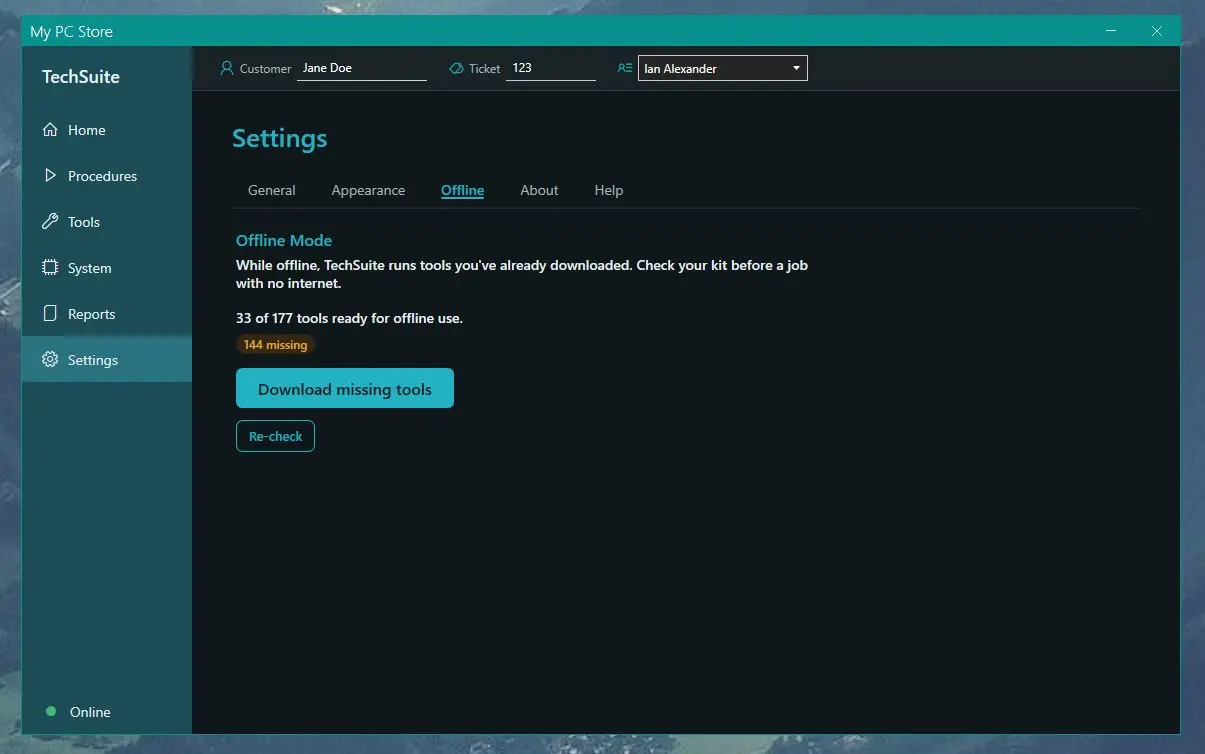
TechSuite can work on a machine with no internet connection, as long as you’ve downloaded the tools beforehand:
- On a connected computer, open Settings → Offline and click Check offline readiness. TechSuite checks which tools are already downloaded.
- Click Download missing tools, then Re-check.
- Copy
TechSuite.exeand theTechSuitefolder next to it (a USB stick is ideal) to the offline machine.
Click the Online/Offline tile at the bottom of the menu to see the connection: status, server, and the signed-in technician. Click Check Connection to try again.
While offline you can’t create or change procedures or Custom Apps. Reports are still saved in the TechSuite\Reports folder.
Run TechSuite from the command line
The same TechSuite.exe runs as a command-line tool when you give it arguments. Output goes to the terminal that ran it, which makes TechSuite easy to use from cmd, PowerShell, a scheduled task or an RMM.
TechSuite.exe --run --procedure "Malware Removal" --customer "Jane Smith" --ticket 1234
Commands
Use one command at a time.
| Command | Short | What it does |
|---|---|---|
--run --procedure <names…> |
-r |
Run one or more procedures |
--run --tool <names…> |
-r |
Run one or more tools |
--download --procedure <names…> |
-d |
Download the tools a procedure needs, for offline use |
--download --tool <names…> |
-d |
Download tools |
--procedures |
-p |
List procedures |
--tools |
-t |
List tools |
--procedure-info <name> |
-k |
Show a procedure’s steps |
--tool-info <name> |
-i |
Show a tool’s details |
--account |
-a |
Show the account TechSuite is signed in to |
--update |
-u |
Check for a new version and install it |
--resume-run |
-n |
Resume an interrupted run |
--set-password <password> |
-s |
Set a startup password |
--remove-password |
-q |
Remove the startup password (give the current one with -e) |
--version |
-v |
Show the version |
--help |
-h |
Show help |
Options
| Option | Short | What it does |
|---|---|---|
--customer <name> |
Customer name for the report | |
--ticket <number> |
Ticket number for the report and PSA integrations | |
--password <password> |
-e |
The startup password, if one is set |
--offline |
-o |
Run without connecting to RepairTech |
--force-console-window |
Open a console window even when nothing launched TechSuite from one, such as a hidden RMM job or scheduled task |
Exit codes
| Code | Meaning |
|---|---|
| 0 | Success |
| 1 | General error, e.g. TechSuite is already running |
| 2 | The arguments couldn’t be parsed |
| 3 | An argument isn’t valid |
| 5 | The startup password is missing or wrong |
| 6 | The command failed |
Check the output as well as the exit code. At the moment, a login problem or a misspelled tool or procedure name still exits with 0.
Running TechSuite from an RMM
- In the Online Dashboard, open Downloads and click Copy URL next to TechSuite Windows App. The link includes your shop’s API key and technician, so treat it like a password.
-
In your RMM, add a PowerShell script that downloads TechSuite and runs a procedure:
$url = "PASTE THE COPIED URL HERE" $exe = "$env:ProgramData\TechSuite\TechSuite.exe" New-Item -ItemType Directory -Force -Path (Split-Path $exe) | Out-Null Invoke-WebRequest -Uri $url -OutFile $exe -UseBasicParsing & $exe --run --procedure "Cleanup" --customer $env:COMPUTERNAME exit $LASTEXITCODE - Run it on any computer. The report uploads to your dashboard when the procedure finishes.
Running a procedure on a schedule
To run Cleanup every week on a customer’s computer:
- Copy
TechSuite.exesomewhere the customer won’t disturb, such asC:\ProgramData\TechSuite. - Open Task Scheduler and create a Basic Task with a weekly trigger, at a time the computer is usually on but not busy.
- Choose Start a program, browse to
TechSuite.exe, and add the arguments--run --procedure Cleanup. If you’ve set a startup password, add-e yourpassword. - On the last page, tick Open the Properties dialog and select Run with highest privileges.
Startup password
A startup password stops anyone else from opening TechSuite. Set it in Settings → General → Security, or with TechSuite.exe -s yourpassword. To remove it, use Remove in Settings or TechSuite.exe -e yourpassword -q. The password syncs to your account, and you can also set it in the Online Dashboard under Tool Configuration.
Settings
- General: the startup password, and where TechSuite keeps its tools.
- Appearance: light or dark theme. TechSuite remembers your choice on that computer.
- Offline: prepare for offline use.
- About: the current version and a link to the release notes.
- Help: documentation, email support, Submit Debug Log (sends us TechSuite’s log when you contact support), and Reset & Restart, which clears the
ConfigandReportsfolders and starts fresh.
Branding and syncing
TechSuite shows your shop’s logo, and your reports carry your branding. Both are set in the Online Dashboard under Branding and Report Settings.
Each time TechSuite starts online, it downloads your shop’s settings, tools, procedures, Custom Apps, technicians and branding. Procedures and Custom Apps you create in the app are saved to your account right away, so every copy of TechSuite gets them. Favorites and the theme are kept on the computer you set them on.
Updates
TechSuite checks for a new version each time it starts online and installs it for you. From the command line, use TechSuite.exe --update. Release notes list what changed in each version.
Troubleshooting
- Antivirus removes or blocks tools. Security software often flags repair tools. TechSuite warns you at startup when it finds third-party antivirus. Pause it for the repair, or exclude the
TechSuitefolder. - TechSuite can’t connect. Some proxy and filtering setups block TechSuite from reaching RepairTech. Click the Online/Offline tile and Check Connection, or work offline.
- TechSuite won’t start. Make sure .NET Framework 4.8 is installed and that you allowed it to run as administrator.
- Still stuck? Use Settings → Help → Submit Debug Log, then email support@repairtechsolutions.com.